In this Tutorial, we will be learning how to use Capacitive Touch Sensor and its integration with Processing. If you are new to Processing, have a look at my previous Processing Tutorials from scratch :
Introduction

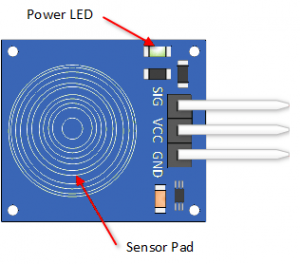
TTP223 Capacitive Sensor is a low-cost device. When you touch the sensor pad ( the concentric circles on the board ) , the capacitance of the circuit changes and the detected change in capacitance results in the output changing states. The irony is you don’t even need to touch the sensor pad. Even if you bring your finger close to the pad you can flip the digital state to High. A capacitive touch-screen measures these capacitive changes and computes the position of the finger ( Not this sensor! ). Capacitive technology can respond correctly to the use of multiple fingers because the sensor measures capacitive changes over all locations independently within the sensor and track two or more fingers.
Parts Required
Board Layout

Pin Wiring
Sensor Pin Arduino Pin
 VCC                        5V
 GND                       GND
 SIG                        6
Arduino Test Code
Open the Arduino IDE and upload the following code ( Set Baud Rate to 9600 ) :
#define sensor_pin 6 // Pin for capacitive touch sensor

int ledPin = 13; // pin for the LED

void setup()
{
  Serial.begin(9600);
  pinMode(ledPin, OUTPUT);
  pinMode(sensor_pin, INPUT);
}

void loop()
{
  int value = digitalRead(sensor_pin);
  if (value == HIGH)
  {
    digitalWrite(ledPin, HIGH);
    Serial.println("Touch Detected!");
  }
  else
  {
    digitalWrite(ledPin,LOW);
    Serial.println("No Touch");
  }
  delay(500);

}
Output
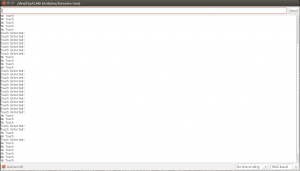
When you place your finger on the touch pad or bring it near the pad , you get “Touch Detected!” message.
Arduino + Processing Integration
Now, we’ll be adding a graphical ‘touch’ to the sensor which will help us in improving the Processing skills too. First let us look at the Arduino code which is almost the same.
Arduino Code
int sensor_pin = 6; // Pin for capacitive touch sensor

void setup()
{
  Serial.begin(9600);
  pinMode(sensor_pin, INPUT);
}

void loop()
{
  int value = digitalRead(sensor_pin);
  Serial.println(value);
  delay(500);
}
Processing Code
Next, open Processing PDE ( Installation and getting started guide in the previous tutorials ) and upload the following code :
import processing.serial.*;
Serial port;
float capacitive= 0;
void setup()
{
  size(1023,1023);

  String portName = Serial.list()[0];
  port = new Serial(this,portName,9600); // Serial(parent,portName,BaudRate)
  port.bufferUntil('\n');
}
void draw()
{
  background(0,0,(capacitive*1023));  // Multiplying by 1023 because capacitive returns 1 in case of touch ( can be neglected if using an analog pin )
}

void serialEvent(Serial port)
{
  capacitive = float(port.readStringUntil('\n'));
  println(capacitive);  // To print the value on the Processing screen
}
Output
When you touch the pad, the screen turns blue else remains black. Also notice the values printed at the bottom of the screen.
Processing Code Explanation
- import : The keyword ‘import’ is used to load a library into a Processing Sketch. Classes grouped together form a library to extend the functionality of the code. ‘ * ‘ loads all such related classes at once.
- Serial.list( ) : Gets a list of all available serial ports.
- this : Refers to the current object.
- 9600 : Baud Rate.
- serialEvent( ) : It is called when data is available.
- bufferUntil( ) : Sets a specific byte to buffer until before calling serialEvent( ).
- new : Creates a ‘new’ object.
Final Comments
Hopefully, you now have good hands on Processing simultaneously. Thank you for visiting the website. In case of any doubt, feel free to ask.


